
TikTok Audio Tips: What Creator Academy Says About Mics, Soundproofing and Clean Sound (2026)
TikTok’s Creator Academy has a three-part series on sound, and the TikTok audio tips in it cover microphones, recording spaces, outdoor noise and the two editing tools TikTok points creators to. The series opens with a plain claim: “When your content sounds great, your videos appear more professional and you seem more credible as a speaker.” It adds that “new viewers are more likely to stick around and remain engaged with content that has crisp, clear sound.”
This guide to TikTok audio tips reports what TikTok says on three pages: Audio 101: Recording audio like a pro, Audio 102: Soundproofing made easy and Audio 103: Polishing Your Audio Before You Hit Publish. Everything below comes from those pages, and each of the TikTok audio tips is credited to TikTok.
TikTok audio tips at a glance:
In this article
- Audio 101: use an external mic if you have one, record in a consistent place with little background noise, and keep music from overpowering your voice.
- Audio 102: small rooms, rugs, pillows, curtains and blankets absorb sound, and TikTok says a closet can be a “great place to set up your first recording studio.”
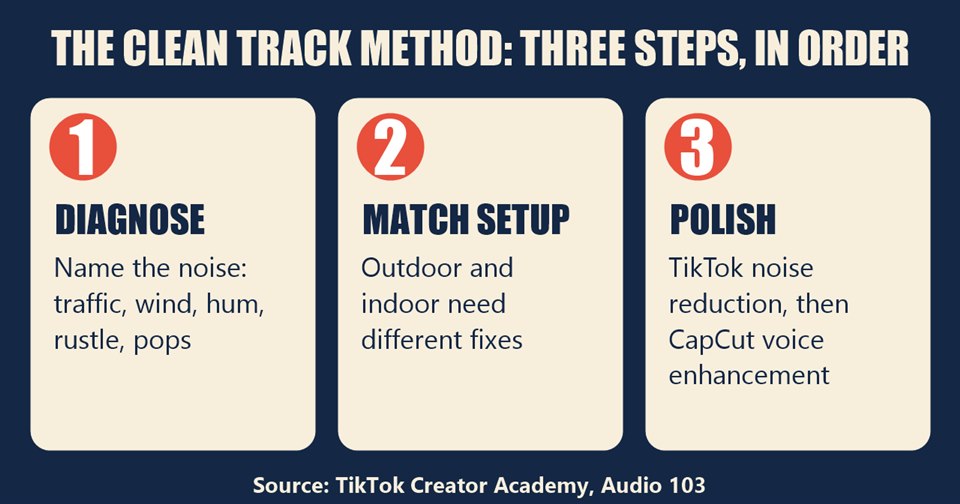
- Audio 103: TikTok’s “Clean Track Method” has three steps: diagnose the noise, match your setup to your location, then polish with one-click tools.
- Quick test: TikTok recommends recording a five-second sound check and playing it back on headphones before the real take.
Why TikTok Audio Tips Start With Sound
The three pages treat sound as part of quality, not an extra, and the TikTok audio tips in them build on each other. Audio 103 puts it bluntly: “Bad audio can lose viewers faster than almost any visual mistake.” It adds that the biggest source of bad audio is not the room but everything outside it.
That line sets up the structure of the series. Audio 101 covers the basics of recording and voiceover. Audio 102 covers the room. Audio 103 covers the noises that come from outside it and the tools to clean up what is left. The sections below follow that order, so the TikTok audio tips read the way TikTok lays them out.
TikTok Audio Tips: The Basics
Audio 101 begins with three production habits. TikTok’s wording for each:
- Use an external mic. “If you have access to an external mic, it can really level up your production quality! Just remember to keep the mic as close to the person who’s talking as possible.”
- Record in a consistent environment. “Do your best to record your sound in a place with minimal background noise. Eliminating breathing sounds in post-production also helps.”
- Balance music and audio levels. “Once you reach the editing stage, make sure your background music doesn’t overpower your audio recording. Try to keep the volume the same throughout your project.”
TikTok groups these as the key audio production tips to consider for the next video. None of these TikTok audio tips requires special equipment except the first, and even there TikTok says only “if you have access” to an external mic.
TikTok Audio Tips for Voiceovers
Audio 101 has a separate set of TikTok audio tips for creators who use a voiceover to guide a video. TikTok says:
- Record in a soundproof room. “Small, carpeted rooms will help block external noises and echos from disrupting your audio. Closets can make a surprisingly great recording studio!”
- Keep your mic 6 inches away from your mouth. TikTok says this distance “will ensure that your recording comes out clear with the least feedback possible.”
- Practice makes perfect. “Run through your script a few times to get comfortable before recording for a smoother flow and more relaxed tone.” TikTok adds that this also saves time in the recording process.
- Take it slow. “Slowing down and enunciating words can increase the clarity of your audio and help your audience follow what you’re saying.”
A later page gives a slightly different distance. Audio 103 says to keep the mic 6 to 8 inches from your mouth indoors and explains the range this way: “Closer makes pops. Further makes you sound distant.” The two pages are separate guides, so this article reports both numbers as TikTok gives them.
The Three Mic Types TikTok Lists
Audio 101 ends with a short list of microphone options, from the least to the most expensive. TikTok describes each one:
- USB or phone mics. “These mics plug right into your phone and are super easy to use! They’re better than internal phone mics and are a great option if you’re looking for something less expensive.”
- Lavalier mics. “These mics can be a bit more expensive but are a smart investment for elevating your production quality, and they can clip right onto your clothing for hands-free recording.” TikTok warns they “may pick up clothing sounds and ruffle noises.”
- Shotgun mics. “These mics are the more expensive option and can be used on cameras or as a boom. They can be directly pointed at the sound source for amazing audio quality.”
TikTok does not name brands or models in these TikTok audio tips, and it does not say which type a new creator should buy.
Soundproofing a Recording Space
Audio 102 is the room guide in the series of TikTok audio tips. TikTok opens it by saying that speaking clearly, having the right equipment and editing sound levels help, “but to make it great, soundproofing is key.” It adds: “In fact, you’ve probably got everything you need to get started already.”
Why soundproofing matters, per TikTok
The page gives two reasons, each in TikTok’s words:
- Absorb and dampen noise. A recording space with less reverb makes “a more pleasant listening experience for your viewer,” and materials that absorb sound “help create a clearer sound quality.”
- Block noise from traveling. TikTok’s examples are “a car honks from the street or a dog barks in the apartment next door,” which can distract listeners or “force you to start your recording over.”
Using what you already own
TikTok says “you don’t need to buy anything fancy to create a great recording studio.” Its three TikTok audio tips for the room:
- Record in a small space. “Small rooms naturally have better acoustics and are much easier to fill with soundproofing elements.” TikTok suggests choosing a space “furthest away from rooms with appliances, like your kitchen or laundry room,” and says “the fewer windows and doors, the better.”
- Use textiles. “Fill your recording room with rugs, pillows, curtains, blankets, etc. These will absorb and dampen sound, minimizing reverb. In other words, the more cozy stuff in your recording space, the better sound you’ll get!”
- Seal gaps. “Block the gaps in doorways, windows, and floors to limit sound waves traveling into the room. Try packing the gaps with a blanket or using the door sweep if you have one!”
TikTok notes that closets “might limit your movement” but are “a great place to set up your first recording studio.”
The Clean Track Method
Audio 103 is the third set of TikTok audio tips and gives the series a named routine. TikTok says that “most audio problems come from predictable noises. Once you can name yours, you can fix it at the source instead of hoping post-production saves you.” It tells creators to run three steps “in order, every shoot.”
The page lists four things a reader will learn: how to spot “the six noises that wreck most TikTok audio before you hit record,” how to match a setup to an outdoor or indoor shoot, how to clean up most problems “with two taps in TikTok and CapCut,” and how to test sound in five seconds.
Step 1: Name the Noise
The first of the TikTok audio tips in Audio 103 is diagnosis. TikTok says “most bad audio is outdoor audio. That’s where you’ll hear it first,” and lists the main outdoor culprits:
- Traffic, sirens, engines
- Wind hitting the mic
- Birds, crowds, construction
- People talking near you
For indoor recording, TikTok calls the culprits “quieter” and lists:
- AC hum, fridge hum, fan whir
- Plastic bag rustle, keys jangling, “anything brushing the mic”
- Pop sounds when the letters p or b hit the mic too hard
- Objects louder than your voice, such as typing, plates and footsteps
TikTok explains why this step comes first: “If you can name the noise, you can match it to a fix. Recording blind means hoping editing saves you. Editing usually won’t fix it completely.”
Step 2: Match the Setup to the Location
Audio 103 says outdoor and indoor recording need different playbooks, and its line is “same mic, different rules.” It links back to Audio 101 for mic placement and to Audio 102 for quieting a room with household items.
The outdoor playbook
- Pick a sheltered spot: under a tree, against a wall, or away from open streets and intersections.
- Use a Bluetooth headset or wired earbuds with a mic. TikTok says they “sit closer to your mouth than your phone and cut wind far better.”
- “Stand with your back to the wind, not facing it.”
- Run TikTok’s one-click noise reduction or CapCut’s voice enhancement after the take.
The indoor playbook
- Keep your mic 6 to 8 inches from your mouth.
- Do not hold anything close to the mic, such as a script in your hand or a coffee cup on the same surface. TikTok says it “will clip.”
- Turn off the AC, fridge or fan if it is in the room. TikTok adds: “Yes, even for one take.”
- Finish with the same noise reduction or voice enhancement.
TikTok sums up the reason for matching setup to place: most “I can’t hear you” comments come from setup, not gear, and “the same phone records totally different audio depending on where you stand and how close it sits.”
Step 3: Two One-Click Fixes
The last of the TikTok audio tips in the method uses two tools, in order. TikTok says “don’t stack more.” They are:
- TikTok noise reduction (in-app): “Edit → Sound → Noise reduction.” TikTok says it “handles background hum and low-level interference.”
- CapCut voice enhancement (AI Enhance Voice): “Audio → Enhance voice.” TikTok says it “sharpens speech and pushes it forward in the mix.”
Among the TikTok audio tips, CapCut is described elsewhere on TikTok’s Creator Academy as a third-party partner, and this site covers its editing features in a separate guide. On what happens if the two tools are not enough, TikTok is direct: “If both tools can’t fix it, the source recording is the problem. Re-record. It’s faster.”
TikTok’s street food example
Audio 103 walks through one scenario. A creator films a 45-second street food review outside a busy taco truck, holds the phone at arm’s length and talks over the cooking line. On playback there is “traffic in the back, your voice underneath, a gust of wind half a second in.”
TikTok names three of the six noises (outdoor traffic, wind and a distant voice), then fixes each: step 10 feet to the side of the truck, plug in wired earbuds with a mic and clip it to the collar, then run noise reduction and voice enhancement. The result, in TikTok’s words: “traffic drops to a low hum. Your voice sits on top. The video becomes easier to follow.”
The 5-Second Sound Check
The final of the TikTok audio tips is a test. Before the real take, TikTok tells creators to record a short test into the same mic. TikTok’s script is a quick testing line, then “I’m going to talk normally about what I’m filming today,” followed by about five seconds of speech at natural volume. Then play it back on headphones and ask four questions, which TikTok lists:
- Can I hear every word clearly?
- Is the background quieter than my voice?
- Any pops, hisses, or wind gusts?
- Does the volume stay even, or does it spike?
TikTok says that if the test fails on any one of them, fix it before filming the rest: “One clip re-recorded beats a whole shoot patched in post.”
Common Mistakes TikTok Lists
Audio 103 closes with five mistakes, paraphrased here:
- Filming outdoors in the loudest spot because the visual looks good, then wondering why the audio is harder to follow
- Holding the phone at arm’s length outside, so the voice competes with every sound around it
- Stacking three noise-reduction effects in post until the voice sounds underwater
- Skipping the 5-second test, then realizing the AC was on the whole shoot
- Letting script paper, keys or a coffee cup brush the mic between sentences
The page ends with a “quick start” for the next outdoor shoot: plug in wired earbuds with a mic and record a five-second test in the exact spot planned for filming. If the background is louder than the voice, TikTok says to “move 20 feet and test again,” and adds that “that habit prevents more audio issues than most editing fixes.”
Other guides on this site that draw on TikTok’s Creator Academy, alongside these TikTok audio tips:
- TikTok Studio: What the App, Web and In-App Versions Offer
- TikTok Templates: How to Use Them and Make Your Own
- TikTok Music Copyright: Why Videos Get Muted, on the separate question of licensed music
- TikTok Symphony: What TikTok Says Its AI Creative Suite Does
- TikTok Smart Split, Playlists and Location Tags
What TikTok’s Pages Do Not Say
- The TikTok audio tips do not name any microphone brand or model, or give a price for the mic types they list.
- They do not explain how audio quality affects whether a video is recommended. TikTok’s claim is about viewers: they “stick around” for clear sound.
- The TikTok audio tips give two mic distances: Audio 101 gives 6 inches and Audio 103 gives 6 to 8 inches. TikTok does not comment on the difference.
- They do not give a decibel level or technical target for a finished track.
Frequently Asked Questions
What are the main TikTok audio tips from Creator Academy?
TikTok’s Audio 101 page lists three: use an external mic if you have one, record in a consistent environment with minimal background noise, and balance music and voice levels so the music does not overpower the recording.
Do the TikTok audio tips say a closet is a good place to record?
Yes. Audio 101 says closets “can make a surprisingly great recording studio,” and Audio 102 calls a closet “a great place to set up your first recording studio,” while noting it might limit movement.
What is TikTok’s Clean Track Method?
It is the routine in Audio 103: diagnose the noise, match your setup to your location (outdoor or indoor), then polish with TikTok’s in-app noise reduction and CapCut’s voice enhancement. TikTok says to run the steps in order on every shoot.
Where is noise reduction in the TikTok app?
Audio 103 gives the path as “Edit → Sound → Noise reduction.”
How close should the mic be to my mouth, per TikTok audio tips?
TikTok’s Audio 101 says 6 inches for a voiceover. Audio 103 says 6 to 8 inches for indoor recording.
Sources: TikTok Creator Academy: Audio 101, Audio 102 and Audio 103 (all read October 30, 2026).